Saturday, October 9, 2021


 Castle

Starting off this semester, we were tasked to get back in the groove of Rhino by constructing a castle. Below are some snippets of mine!


For the construction of this castle I used various tools such as Loft to create the ground/platform, as well as: the Polygon tool, Polyline, and ExtrudeCrv in order to construct walls and the towers. 

The largest difficulty I experienced was having to recall all of the tools in Rhino. I was super rusty after taking such a long break from the program, though I was excited to hop back in and play around building this castle structure!


Saturday, April 10, 2021

 Milestone Projects: Compilation

This post is a summary of each project that I've completed throughout the class. Each of these projects was really enjoyable, and I feel that I've learned a bunch throughout this course!

 Starting with the first project we did, here's a summary of the Objectified Response:


    For this project, our task was to take a look at Gary Hustwit's documentary Objectified, an investigation into the daily items we used and how they are manufactured. Our task was to re-invent an object that we engage with daily.

    For me, this meant reading and the way I bookmark my pages:  Whenever I need to bookmark my page, I tend to bend down the top corner ever so slightly to keep the page booked. Over time, this leads to a bunch of the pages in the book bent in a strange way, especially over a few readings.


To re-create and innovate the bookmark, I decided to add a new feature: a small arrow attached to the bookmark designed to help you mark precisely where you left off:


    This project was a great introduction to the class. I really enjoyed the documentary we watched, as it felt it genuinely influenced my outlook on the objects and the tools we interact with on a daily basis. 

    The greatest challenge for this project was learning the ins and outs of modeling, as this was our first assignment. I spend a lot of the time struggling with shapes and how to fit them together. Furthermore, I feel my concept was pretty successful! This bookmark is definitely something I would use in real life.

The next project we did was the Mesh Mashup assignment:


    This project was a delve into remix culture as we were tasked to combine at least two pre-existing objects and re-imagine them into our own concepts. First we conceptualized 10 different ideas and decided on one to take further. Then we rendered it in different programs until we had a final product.


    This project was definitely one of my favourite assignments of the class. I really enjoyed playing around with different lighting effects, especially playing around with different lighting effects to make the lava glow! I think the rendering was very successful, and was super enjoyable to learn.


    One of the difficulties I had with this task was applying different colours to the model itself. In one of the programs I figured out how to individually paint polygons to have them be different colours, but failed to translate it into the final version.

    (Solution for next time, credited to Bryan!: have two different Earths, one blue and one green. Because the land is slightly elevated from the water, I could size them in a way to have each part be a different colour/texture!)


Afterwards, we did our PaperCraft Object project:


    This project was by far the most unique project we did for this class! We were assigned to create objects that we were able to print out and fold, sort of like origami. After conducting some research on other artists that use paper, we did some practice by modeling 10 objects that we use in our daily lives, then later chose one object from our childhood that we would be pursuing. Mine was a stuffed bear from my childhood!


After creating our models in Rhino, we printed them out in real life to do a trial version:


This prototype version was very useful, as I learned a lot from this trial fold to apply to my final version.


    This project was really enjoyable, and I had a blast with the hands-on style. I felt that I had a lot of challenges, though the biggest one would be the stage where you're folding it in real life. A lot of my tabs felt small, and looking back on it I may have made my model a little too complex for myself.

    Regardless, I really enjoy the final project and love having this little guy on my desk! My favourite part of this project is definitely having the final version, as being able to handle it and feel it is super rewarding.

Our final project for this class was our Hybrid 3D Model:


This project was definitely one of my favourites, and was a great way to wrap up the class. Our first task was to create 6 different concepts of self-supporting objects before meeting with our partner to create a hybrid between each of our objects!

My concept:


Final hybrid between mine and Liro's objects:


    My favourite part of this task was being able to generate some concepts on paper. It was really refreshing to be able to draw some stuff out for this class! It was pretty fun coming up with the concepts themselves, and trying to find harmony between each object was challenging but enjoyable.


    The greatest challenge for this project would have to be the technical elements. Having to ensure the project would be properly printable was a little stressful, as there were a couple of restrictions you had to stay mindful of. Overall this project was awesome, and I'm really excited to see the final product all printed out!


    This class was really a joy to attend each week. Each project was the perfect amount of challenging and rewarding, and I've really learned some skills when it comes to 3D modelling. Each week's task brought something new and kept the activities fresh, while also leaving room to explore and learn.

Thanks for reading, and thanks for the awesome term!


Wednesday, April 7, 2021

 PaperCraft: Final Revision

It took me a little longer than expected to finish this project, but here it is! I documented the process and included some shots of the final model. 


Overall this project was super enjoyable, and I think I learned some valuable tools in Rhino! The real-life folding came with some challenges, but overall I'm pretty pleased with the outcome!

The template + model in Rhino:


Thanks for reading!

Saturday, April 3, 2021

3D Printed Hollow Form Object:
The Hybrid

    Over the past couple of weeks we have been working on our next project, a hollow, self-supporting object designed to be 3D printed. To start, we came up with 6 concepts to generate some ideas and get the ball rolling!

Here they are:


After meeting with my partner, Liro, he showed me some of the concepts he designed!
Here's some of his work:


After some discussion, we decided we would combine these two forms:

We chose these two forms because we each felt that these were the strongest out of each bunch, and that we could come up with some cool possibilities with such such two differing and unique objects!

It was one of my tasks to generate some possible concepts and directions we would take the mash-up of these two forms, so here's some sketches of possible combinations:

The next step was to start feeling out each form in Rhino, so Liro did some experimentation with 3D modeling some of the concepts:

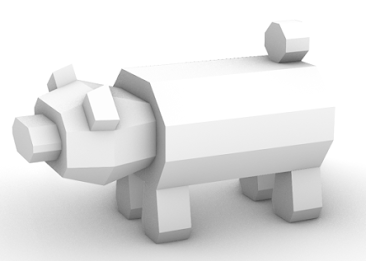
We agreed that the middle form was the coolest representation of each object, so we decided to move forward with it! After taking the object into PrusaSlicer, it turns out the object was already perfectly printable!

Here's our final product:

    In order to mash-up our objects, we decided to utilize separate elements from each concept and combine them in order to create a brand new object that represents both of the originals. We chose to use the overall shape and silhouette from object #1, while also bringing in the organic curves and smooth planes from object #2. 

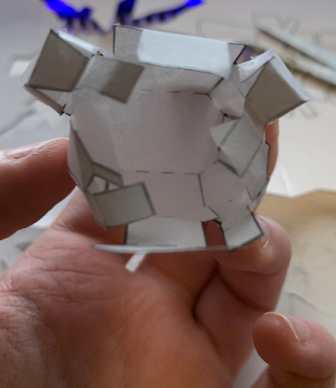
    We chose to move further with this concept because we felt that it had the strongest combination of elements from each object, and was the most appealing form from our mash-up concepts. This project was really fun, and was an awesome project to end the class. I'm pretty happy with the end result, and anxious to see the object printed in real life!

Thanks for reading!

Sunday, March 14, 2021

 PaperCraft Objects: First Prototype


    After printing out and assembling my bear model from last week, it was time to put it together! I learned a lot from this first prototype and understand a lot better how to further improve my model and make it more simple to assemble. For next week, I want to focus on improving my model in several ways:

While printing the model out on paper, I think it would be a lot easier to assemble on a larger scale. Next time I'll print out the legs, head, and body on separate sheets of paper so I can make each component larger. While assembling my first prototype, I had issues handling and manipulating several parts of the model since they were so small.

Tabs!! I forgot to add tabs. Before printing out my model once more, I'll edit the template to add tabs. This will allow me to construct the model neatly. Since I forgot tabs, I had to construct the bear using tape (which came with it's own difficulties). Adding tabs for next week will allow me to assemble the object neatly and with glue this time!

Overall, this project was super fun! It was really rewarding to assemble the first prototype of this project. Even though it's a little messy and didn't quite come together the way I was hoping, I think the improvements I have in mind will help bring it to a clean and satisfactory level.

Progress shots:


Tuesday, March 9, 2021

 PaperCraft Objects: Printed Template


    This week, we were assigned to make one more faceted form in Rhino using planar surfaces. We were asked to recreate an object of importance from our childhood, so I decided I would recreate my old stuffed bear to print and fold into a paper version. This stuffed bear means a lot to me, and I've had it ever since I was small, so I wanted to recreate him for this project. I thought it would be super adorable to be able to have tiny paper versions of the bear and keep them on my desk! 

Here's the folded version in Rhino:


(rendered)

Here's the unfolded version:

I split the main model up into six parts: the head, the body, and four legs. Hopefully this makes it a little more simple to assemble when printed.
(top is head, bottom left is body, bottom right are four arms)


Here's the unfolded version after using the command Make2D.

This will be what I print to fold the object later! I made sure to leave out any tangent edges, and used a different linetype to distinguish between the parts you cut and the parts you fold.


In conclusion, I really enjoyed this project. It was fun constructing the model, it was something that was super unique and I'm glad I got to try it. I'm really pleased with my bear model and can't wait to try assembling it next week! Thanks for reading.


Wednesday, March 3, 2021

PaperCraft Object Samples


    This week in class we were tasked to create faceted forms made from planar surfaces in Rhino. We then used the explode function and rotate3D to unfold the objects. I think the biggest challenges with this project for me is the steep learning curve. I found myself frustrated having to figure out the many commands Rhino requires you to use. This project was rewarding in it's own way, but was very difficult for me.

Here they are!

Concept 1:


I wanted to start with something simple, so I modeled this object after the chapstick that's always sitting on my desk.


Concept 2:


For this form I continued familiarizing myself with Rhino's planar forms, so I attempted a simple box. It's not modeled after anything specifically, but I imagine it as a cute paper planter.


Concept 3:


For this object I envisioned a small paper hat. It's modeled after one of my mom's hats that she enjoys wearing.


Concept 4:


For this concept I thought it would be funny to create a paper weight. I always keep dumbbells in my room, and thankfully these ones will be easier to lift!


Concept 5:


This form is modeled after my pencil case, and I use it every time I want to draw. I thought it would be cool to have a paper box that you could open and close, so I wanted to attempt a design for one.


Concept 6:


Of course I need a paper pencil to go with my paper pencil case as well! Pencils are my favourite tools to work with, and I always have one around. 


Concept 7:


For this form I wanted to try challenging myself. After looking around my room for more ideas, I decided to create my Etch A Sketch as well. This design was a difficult to pull off, but in the end I think it paid off!


Concept 8:


I wanted to continue challenging myself, so I decided to create the form of a hammer. The unfolded version became a little confusing, but I'm pleased with the outcome. I don't own a hammer, so I thought it would be useful to make one out of paper!


Concept 9:


The hammer and Etch A Sketch took me a while, so I decided to visit another simple form. This object is modeled after a flashlight. It's always important to keep one around in case of emergencies. I keep my emergency flashlight in my closet!


Concept 10:


For my final concept I decided to create a camera. This form is modeled after a camera I keep in my room and have used to take countless photos.


Although I found this assignment difficult, it was very rewarding. I felt I've become comfortable creating (and unfolding) planar surfaces in Rhino. My favourite part of this project was getting to see the form's unfolded version. It was so satisfying rolling it apart!
 
Thanks for reading!